Samer Aoudi
Intrusion Detection and Prevention

In this practical activity, you will apply countermeasures to detect intrusion and filter network traffic.

Prerequisite Knowledge: Basic networking knowledge; Linux commands; Network Traffic Analysis
Requirements: Kali Linux + HawkEye-Lite VM
Duration: 60+min
Files: HawkEye-Lite
Related Videos:

"Snort is the foremost Open Source Intrusion Prevention System (IPS) in the world. Snort IPS uses a series of rules that help define malicious network activity and uses those rules to find packets that match against them and generates alerts for users." (Source and learn more »)

Snort rules are divided into two logical sections, the rule header and the rule options.

Syntax:

rule header (rule options)

Example:

alert tcp any any -> 192.168.1.0/24 80 (msg:"Possible web attack"; content:"GET"; nocase; sid:1000001; rev:1;)

Rule Header: The rule header defines the action, protocol, source IP/port, destination IP/port, and direction as shown in the table below:

Component Description Example
Action Specifies what Snort should do when the rule matches. Common actions include alert, log, pass, drop. alert
Protocol Defines the protocol for matching packets. Supported protocols are TCP, UDP, ICMP, and IP. tcp
Source IP Specifies the source IP address or network of the packet. Use any for any IP or specify a subnet with CIDR notation. 192.168.1.0/24 or any
Source Port Defines the source port of the packet. Use any for any port or specify a range. 80, any
Direction Indicates the packet flow direction. Use -> for one-way or <-> for bidirectional traffic. ->
Destination IP Specifies the destination IP address or network of the packet. any or 10.0.0.0/8
Destination Port Defines the destination port. 80

Rule Header Action: Common Actions

Action Description
alert Generates an alert when the rule matches and logs the packet details.
log Logs the packet details without generating an alert.
pass Ignores the packet and takes no further action when the rule matches.
drop Drops the packet without sending it to the recipient. Only available in inline mode.
reject Rejects the packet and sends a reset to the sender, indicating the connection is closed. Only for inline mode.

Rule Options: The rule options specify the conditions under which the rule will trigger. Each option is enclosed in parentheses and separated by a semicolon. Here are some common options:

Option Description Example
msg Specifies the message that will appear in the alert when the rule is triggered. msg:"Possible web attack";
content Searches for specific data in the packet payload. It can be combined with other modifiers like nocase to make it case-insensitive. content:"GET"; nocase;
sid A unique identifier for the rule. Use SIDs above 1000000 for custom rules. sid:1000001;
rev The revision number for the rule, used for versioning. rev:1;
flags Checks for specific TCP flags like SYN, ACK, FIN, etc., to filter traffic. flags:S;
depth Specifies how far into the packet to search for the content keyword. depth:4;
offset Sets the starting point in the packet payload to begin the content search. offset:10;
ttl Filters packets based on Time To Live (TTL) values. ttl:64;
flow Indicates the direction of the traffic flow, e.g., to_server or to_client. flow:to_server;
pcre Performs a regular expression search on the packet payload, allowing for more complex pattern matching. pcre:"/^GET\s/";

In this activity, you will install and configure Snort IDS.

Expert Mode
  1. Download and run the new HawkEye-Lite VM
  2. Install and configure Snort on HawkEye-Lite
  3. Set the home network variable to the local network address
  4. Disable all community rules
  5. Enable PCAP logs
  6. Add CSV alert log and make the default log
Regular Mode
Task in details »
  1. Download, extract, and start the new HawkEye-Lite VM
  2. Log in using csf/csf as credentials and open a new Terminal window
  3. If you want to avoid using sudo for commands the require root permissions, you can use the sudo su command
  4. Gain superuser (root) privileges sudo su
  5. Update the HawkEye-Lite apt-get update
  6. Install Snort with the 'Yes to all option' and accept default network range (OK/Enter) apt-get install snort -y
  7. Upon successful completion, display the Snort version snort -V
  8. gedit is an open-source user-friendly text editor that can make editing configuration files a litte less intimidating
  9. Install the gedit text editor apt-get install gedit
  10. Did you notice that when we used sudo su, there was a delay? This is because I intentionally did not change the hostname in the /etc/hosts file. Let's fix this
  11. Open the /etc/hosts file gedit /etc/hosts
  12. Change the value of 127.0.1.1 to HawkEye
    /etc/hosts
    Changing hostname is done in two files /etc/hostname and /etc/hosts
  13. Save and close the hosts file
  14. Let's see what's in the snort directory. List the contents of the snort directory ls -la /etc/snort/
  15. Open the Snort configuration file using gedit gedit /etc/snort/snort.conf
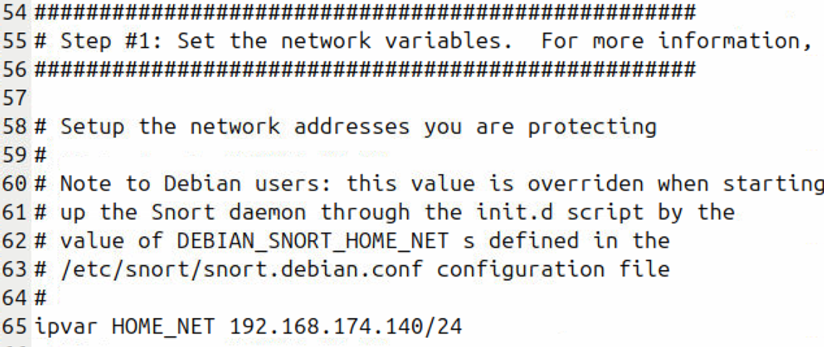
  16. Change the value of the HOME_NET variable from any to your current network address. Example:
    ipvar HOME_NET 192.168.174.140/24
    Home_net
    Use your network address, not mine!
  17. Locate the Rule Path variable, and note the value var RULE_PATH /etc/snort/rules
  18. Snort comes with a set of community rules. However, we want to create our own rules and disable all other rules to be able to observe our rules in action without interference.
  19. Locate the rule set section (when this activity was created, the section is under: Step #7: Customize your rule set; this may differ in other versions)
  20. Comment out all rules other than local.rules using the # character. Examples:
    #include $RULE_PATH/app-detect.rules
    #include $RULE_PATH/attack-responses.rules
    #include $RULE_PATH/backdoor.rules
  21. Next, we want to configure the output logs:
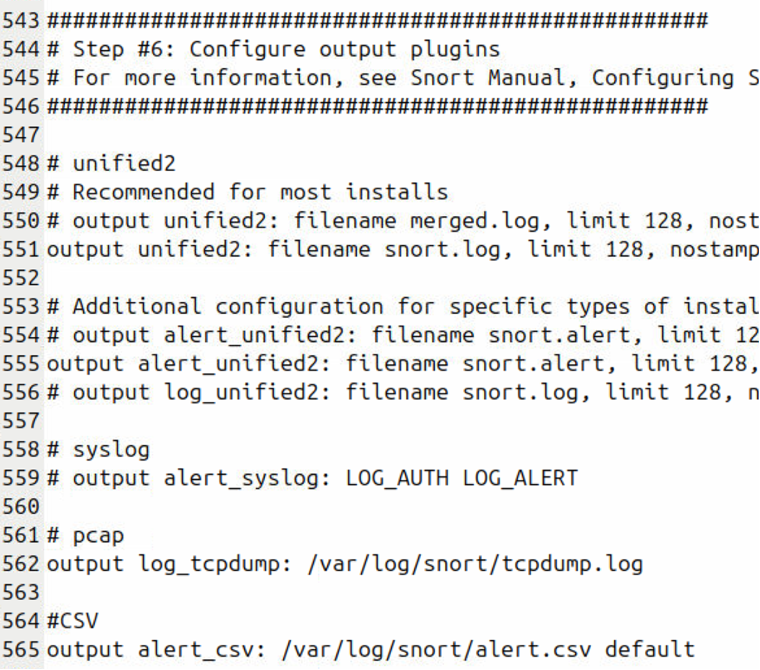
  22. Locate the output plugins section (when this activity was created, the section is under: Step #6: Configure output plugins; this may differ in other versions)
  23. Uncomment (remove the #) the PCAP logs and update the path: output log_tcpdump: /var/log/snort/tcpdump.log
  24. Add a CSV alert log and make default: output alert_csv: /var/log/snort/alert.csv default
    Snort Logs
    Log Files
  25. Save and close the snort.conf file
  26. Test to ensure no errors in the snort.conf file we just edited
    snort -T -i ens33 -c /etc/snort/snort.conf
  27. You should receive a message saying that Snort successfully validated the configuration. If not, go back to snort.conf and fix the reported error.
    Snort successfully validated the configuration!
     Snort exiting
Writing Snort rules involves defining conditions to detect certain network patterns or behaviors. Snort rules use a specific syntax that enables you to customize alerts, block traffic, and log specific packets. A basic Snort rule consists of two main parts: the rule header and the rule options.
  1. The rule header defines the action, protocol, source IP/port, destination IP/port, and direction.
  2. The rule options specify the conditions under which the rule will trigger. Each option is enclosed in parentheses and separated by a semicolon.
To write our own rules, we will use the local.rules file located in the /etc/snort/rules/ directory
Run Snort (Console Output) snort -q -i ens33 -c /etc/snort/snort.conf -A console
Run Snort (Log Output) snort -q -i ens33 -c /etc/snort/snort.conf -l /var/log/snort/

In this activity, you will create your own Snort rules and test these rules by running Snort as an IDS.
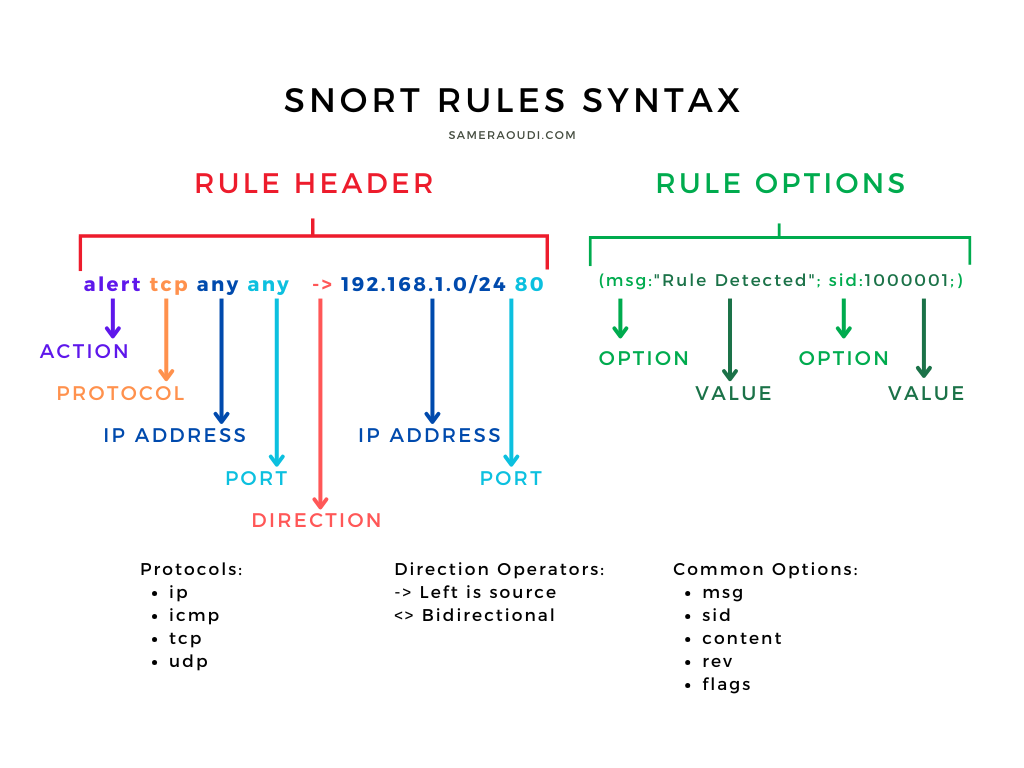
Snort Rules Syntax Figure: Snort Rules Syntax
Expert Mode
  1. Install VSFTP server (for FTP traffic testing)
  2. Enable Allow anonymous login on the FTP server
  3. Install Apache2 server (for web traffic testing)
  4. Install Telnet server
  5. Write and test the following custom Snort rules
  6. Rule 1: Detect ICMP Traffis
  7. Rule 2: Detect an HTTP GET request
  8. Rule 3: Detect an SSH connection attempt on port 22
  9. Rule 4: Detect FTP connection attempts on port 21
  10. Rule 5: Detect Telnet connection attempts on port 23
  11. Rule 6: Detect SQL injection attempt on your website
Regular Mode
Task in details »
  1. List the contents of the rules directory and note down some of the rules files we commented out in snort.conf
    ls /etc/snort/rules/
  2. Open local.rules for editing: gedit /etc/snort/rules/local.rules
  3. On a new line at the end of the local.rules file, we will add the following rules:
  4. Rule 1: Create an alert when ICMP traffic is inbound from any source or port to any port in the local network. When the alaram is triggered, a message is set "ICMP Detection Rule" with a unique ID 1000001
    alert icmp any any -> $HOME_NET any (msg:"ICMP Detection Rule"; sid:1000001;)
    ICMP Rule
    The ICMP rule in the local.rules file
  5. Save and close local.rule
  6. Now, let's test rule by running snort and generating ICMP traffic:
  7. Run Snort snort -q -i ens33 -A console -c /etc/snort/snort.conf

  8. With Snort running, start Kali Linux and open a new terminal
  9. Scan the network to get the HawkEye-Lite IP address nmap -sn <your_network_address>
  10. Ping HawkEye-Lite ping <HawkEye_ip>
  11. While ping is running, go back to HawkEye-Lite and observe the console output
  12. Go ahead and stop Snort and back in Kali, stop the ping command
  13. To make generating traffic and testing more interesting, let us install some servers on our VM
  14. Install VSFTP server apt-get install vsftpd
  15. Install Apache2 server apt-get install apache2
  16. Open the FTP server configuration file gedit /etc/vsftpd.conf
  17. Allow anonymous login by editing the config file. Change anonymous_enable from NO to YES
  18. Save and close the config file
  19. Restart the server service vsftpd restart
  20. Install Telnet server apt-get install telnetd
  21. Upgrade the newly installed Telnet server apt-get upgrade telnetd
  22. Enable telnet by editing the inetd.conf file gedit/etc/inetd.conf
  23. Uncomment (remove the #) the Telnet line
  24. Test the FTP and HTTP servers from Kali

  25. Let's write more custom rules in the local.rules file. When done, save and test:
  26. Rule 2: Detect an HTTP GET request alert tcp any any -> any 80 (msg:"HTTP GET request detected"; content:"GET"; sid:1000002; rev:1;)
  27. Rule 3: Detect an SSH connection attempt on port 22 alert tcp any any -> any 22 (msg:"SSH connection attempt"; flags:S; sid:1000003; rev:1;)
  28. Rule 4: Detect FTP connection attempts on port 21 alert tcp any any -> any 21 (msg:"FTP attempt detected"; sid:1000004; rev:1;)
  29. Rule 5: Detect Telnet traffic on port 23 alert tcp any any -> any 23 (msg:"Telnet traffic detected"; sid:1000005; rev:1;)
  30. Rule 6: Detect SQL Injection attempts on your website alert tcp any any -> any 80 (msg:"SQL injection attempt"; content:"SELECT"; nocase; sid:1000006; rev:1;)
  31. Run Snort to test the rules above
  32. While Snort is running, generate the necessary traffic (from Kali) for each rule. Every time you generate the traffic below, go back to HawkEye and observe the console.
  33. HTTP GET: Enter HawkEye-Lite IP address in the web browser. Example: http://192.168.174.140
  34. SSH: Attempt an SSH connection. Example: ssh csf@192.168.174.140
  35. FTP: Attempt an FTP connection. Example: ftp 192.168.174.140
  36. Telnet: Attempt a Telnet connection. Example: telnet 192.168.174.140
  37. Use alternative methods to generate SSH, FTP, and Telnet traffic and show your instructor
  38. SQL Injection: Use the web browser, but add the following parameter at the end of the IP addres http://192.168.174.140?q=select
    All Rule
    All our custom Snort rules
  39. Run Snort to test the rules above
  40. Our custom rules should kick in, and as soon as the relevant packet is detected, Snort should display our custom messages. All the test traffic we generated above was directed to the HawkEye VM where Snort is installed. However, in all our rules, we specified any [IP address] within our local network (HOME_NET). So the question is, will Snort detect rule traffic if directed to Metasploitable? Let's test it.
  41. Start the Metasploitable VM and get its IP address nmap -sn <networ_ip>
  42. Generate same HTTP, FTP, Telnet, and SSH traffic but using the IP address of Metasploitable
  43. Our Snort rules should be triggered, but why? Snort IDS can detect traffic going to other machines in the same network, but only under certain conditions. In real life, Snort must be installed on a machine that has access to the traffic of the devices you want to monitor. This typically involves connecting Snort to a network tap, port mirror (SPAN port) on a switch, or using it in a network segment where it can see all traffic. In our virtual lab environment, Snort is operating in Promiscuous Mode, which allows the network interface to capture all packets on the local network segment, not just those addressed to the Snort machine. We enabled Promiscuous Mode when we used the -i (interface option).
  44. Repeat testing your rules, but this time, run Snort and log all alerts to the default CSV log instead of the console
iptables: is a powerful firewall tool for Linux that allows administrators to manage and filter network traffic. It operates within the Linux kernel using the netfilter framework and enables control over incoming, outgoing, and forwarded packets based on a set of rules. While it is technically a tool for packet filtering and manipulation, it functions as a firewall because it can control the flow of network traffic based on predefined security rules.

Concept Description
Packet Filtering iptables inspects packets as they pass through the network stack, deciding whether to allow or block traffic based on predefined rules.
Rules and Chains Rules: Each rule specifies criteria for matching packets, such as IP, port, and protocol.
Chains: Chains are lists of rules that a packet will traverse in a specific order. Common chains include:
  • INPUT: For packets destined for the local system.
  • OUTPUT: For packets originating from the local system.
  • FORWARD: For packets routed through the system.
Tables iptables organizes rules into tables, each serving a different purpose:
  • filter: The default table, used for packet filtering.
  • nat: Handles network address translation, such as masquerading or port forwarding.
  • mangle: For modifying packet headers (e.g., changing TTL).
  • raw: Controls packets that aren’t tracked by connection tracking.
Targets The target determines what action iptables will take on packets that match a rule. Common targets include:
  • ACCEPT: Allow the packet.
  • DROP: Silently drop the packet (no response to sender).
  • REJECT: Drop the packet and send an error message back to the sender.
  • LOG: Log packet details for later review.
ARP: Address Resolution Protocol (ARP) is a stateless protocol used for resolving IP address to machine MAC address. The ARP table is used to maintain a correlation between each MAC address and its corresponding IP address.
Option Description
-L lists all the rules for a specified chain (e.g., INPUT, FORWARD, OUTPUT). If no chain is specified, it lists rules for all chains in the current table. Examples:
iptables -L
iptables -L INPUT
iptables -L | grep policy
-A Appends the iptables rule to the end of the specified chain. Examples:
iptables -A INPUT
iptables -A OUTPUT
-D Deletes a rule in a particular chain by number
-F Flushes the selected chain, deletes every rule in the the chain
-P Sets the default policy for the specified chain
-j Jumps to the specified target when a packet matches a particular rule
-p Sets the IP protocol for the rule, which can be either icmp, tcp, udp, or all
--dport Sets the destination port for the packet
-s Sets the source for a particular packet

Common iptables Options

In this activity, you will use Linux's iptables as a firewall to allow, filter, and log network traffic.

Expert Mode
  1. View current iptables rules
  2. Block All Incoming ICMP Traffic
  3. Block All Outgoing ICMP Traffic
  4. Block All Incoming UDP Traffic
  5. Allow Incoming Traffic on Port 80 (HTTP)
  6. Block All Incoming Traffic from a Specific IP
  7. Set Up Port Forwarding (e.g., Redirecting Port 8080 to 80)
  8. Logging and Dropping SSH Packets
Regular Mode
Task in details »
  1. View current iptables rules iptables -L
  2. View current iptables rules with additional informaiton iptables -L -v
  3. View current iptables with focus on overall policy iptables -L | grep policy
  4. Notice that the default for all chains (INPUT | OUTPUT | FORWARD) is ACCEPT. Let's change the INPUT policy to DROP (i.e., DROP all incoming traffic).
  5. Block All Incoming Traffic (regardless of protocol) iptables -P INPUT -P DROP
  6. View policy again iptables -L | grep policy
  7. Go to Kali and perform a network scan nmap -sn network_address
  8. Notice that HawkEye was not detected! Why? Because all incoming traffic was blocked. As you can see, although the HawEye machine is on and in the network, we couldn't detect it. If you recall, we learned some countermeasures to trick firewalls. Let's repeat with -sF option
  9. From perform a network scan with the FIN option nmap -sF network_address
  10. With the -sF option, nmap will be able to detect HawkEye as a 'filtered' host. The policy we applied to drop all incoming traffic allows to implement what important security principle? Think about it, and if in class, share your answer. Hint: With this strict policy in place, we can then make exceptions, by allowing traffic incoming to a specific service (e.g., HTTP traffic). For now, let's go ahead and reverse the DROP all policy for the INPUT chain, and apply some new rules.
  11. Allow All Incoming Traffic iptables -P INPUT -P ACCEPT
  12. Block All Incoming ICMP Traffic iptables -A INPUT -p icmp -j DROP
  13. Block All Outgoing ICMP Traffic iptables -A OUTPUT -p icmp -j DROP
  14. Block All Incoming UDP Traffic iptables -A INPUT -p udp -j DROP
  15. Let's test the rules we defined.
  16. From HawkEye, ping the Metaspolitable VM ping metasploitable_ip
  17. From Kali, ping HawkEye ping hawkeye_ip
  18. From Kali, test UDP traffic sudo hping3 -2 hawkeye_ip
  19. Next, we want to backup the rules, we created in a file. We can then use this file to restore our rules.
  20. Backup our rules in a file called rules.bak iptables-save > rules.bak
  21. Next, we want to delete rules. To delte a rule, we need the -D option along with the chain (INPUT, OUTPUT, etc.) and the rule number (in order)
  22. List the rules to verify we have 3 rules iptables -L
  23. Delete the udp INPUT rule iptables -D INPUT 2
  24. Delete the ICMP INPUT rule iptables -D INPUT 1
  25. Delete the ICMP OUTPUT rule iptables -D OUTPUT 1
  26. Next, we want to use the backup file rules.bak to restore what we just deleted.
  27. List the rules to verify the rules are deleted iptables -L
  28. Restore rules from a file called rules.bak iptables-restore < rules.bak
  29. List the rules to verify we have 3 rules restored iptables -L
  30. In the next section, we want to use iptables by following common practice. We will apply the Least Privilege Principle (it was the answer to the question above), and then make exceptions for our HTTP, SSH, and FTP traffic.
  31. Delete ALL existing rules
  32. Create a new policy rule to block all incoming traffic
  33. Create 3 rules that allow incoming traffic on ports 80, 22, and 21
  34. Test the above


  35. In the test above, we performed a TCP scan on 4 ports. The 3 with exceptions, are shown as open. While Telnet (port 23) is shown as filtered. In the future, if you install a new server, the port will be filtered because of our policy rule. A new exception would need to be added.
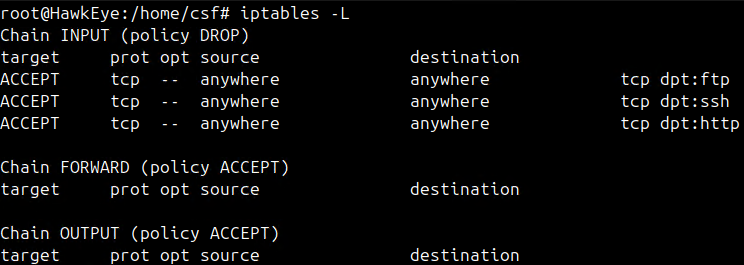
    All Rule
    Least Pivilege Final Outcome
Coming soon.
               
© Samer Aoudi 2005-2024