Setting Up a Lab Environment
In this practical activity, you will set up an Ethical Hacking (Pentesting) lab environment. Setting up a penetration testing lab requires careful planning to ensure it provides a safe, functional, and realistic environment to practice ethical hacking. A typical isolated setup would have the following components:
[Attacker Machine]
       |
[Router/Firewall]
       |
[Target Network]
    [Target VM1]
    [Target VM2]
    [...]
| Why this activity? | Our setup provides a well-rounded environment for practicing penetration testing while ensuring safety and realism. Setting up a pen testing lab environment is a crucial skill for a penetration tester |
| Baseline Knowledge | Basic understanding of networking |
| Requirements | Windows PC (min 16GB RAM) with VMWare Workstation |
| Downloads | Kali Linux, Windows 10 Target, Metasploitable 2 |
| Duration | 50min |
Objectives: In this task, you will set up the first component of the lab environment; namely, the attacker machine. For our setup, we will use Kali Linux for this purpose. We will use this attack machine (AKA, Tiger Box) to attack targets (i.e., conduct pentests).
Must Know:
Kali Linux Kali Linux is the new generation of the industry-leading BackTrack Linux penetration testing and security auditing Linux distribution. Kali Linux is a complete re-build of BackTrack from the ground up, adhering completely to Debian development standards.” (Source and to learn more: http://docs.kali.org/). Kali Linux is a free open source toolbox with more than 600 penetration testing tools included. Kali Linux will be our main tiger box (toolbox).
The virtual networking components in Workstation Pro include virtual switches, virtual network adapters, the virtual DHCP server, and the NAT device. You can configure bridged networking, NAT, and host-only networking for virtual machines.
Bridged Networking
Bridged networking connects a virtual machine to a network by using the network adapter on the host system.
NAT Networking
With NAT, a VM does not have its own IP address on the external network. Instead, a separate private network is set up on the host system. In the default configuration, a virtual machine gets an address on this private network from the virtual DHCP server. The VM and the host system share a single network identity that is not visible on the external network.
Host-Only Networking
Host-only networking creates a network that is completely contained within the host computer. Host-only networking provides a network connection between the VM and the host system by using a virtual network adapter that is visible on the host OS.
Note: The steps below are based on VMWare Workstation. You can skip steps 1-3 if the VM is already provided by your instructor
Note: If you want to perform a full installation (advanced), you can download the appropriate Bare Metal (i.e., .iso disk image) version. This is the best option if you want to install on an Apple machine with an M chip
Note: If you are using Oracle VirtualBox, open the OVA file. If you are doing a full installation (advanced), read the detailed guides Virtualization Guides »
Notice Kali's credentials in the Description section before you power it on
Objectives: In this task, you will set up two target machines; namely, Metasploitable 2 and Windows 10. With the Attacker Machine (Kali Linux) ready, and the Firewall left for a later activity, we need a Target Network to attack:
[Attacker Machine]
       |
[Router/Firewall]
       |
[Target Network]
     [Metasploitable2 VM]
     [Windows 10 VM]
    [HawkEye VM]
    [Exam VM]
    [Project VM]
Must Know:
Vulnerable Targets There are hundreds of intentionally vulnerable VMs that you can use. One popular source is VulnHub », where one of our targets can be found.For exams and projects, we will use different targets.Note: You can skip step 1-4 if the VM is already provided by your instructor
Note: The step above will help you select other targets in the future (eg., for your project). Notice the Format: Virtual Machine (VMware) and Operating System: Linux
Note: Don't log in to the target VM. In real life this would be a machine we will attack and therefore, we will not have its login credentials readily available!
Note: the ip a command provides the displays detailed information about all network interfaces, including their IP addresses. In the screenshot below, you can see two network interface names (eth0 and lo). The loopback interface lo has the loopback IP 127.0.0.1 which is a special IP address used by a computer to communicate with itself. The relevant interface for us is eth0 (ethernet 0). In the screenshot below, Kali's IP address is 192.168.135.154 and the network address is 192.168.135.154/24 (i.e., 24 bits of this address, or 192.168.135, represent the network).
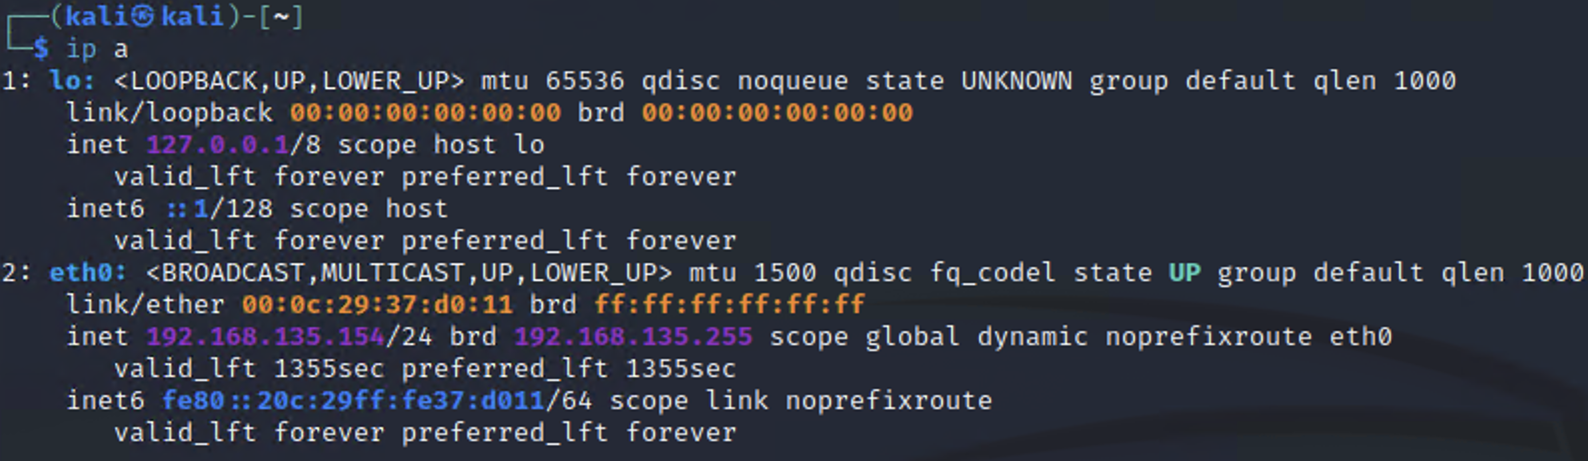
ip a output
Note: in my network, shown in the screenshots, Kali's IP address is 192.168.135.154 and a quick host discovery scan reveals 4 live hosts. One of them is Kali and the other one is the Metasploitable target. Then what are the other two (192.168.135.1 and 192.168.135.2)? The .1 address is often assigned to the default gateway or router of the network. The .2 address is often assigned to the host machine’s virtual network adapter that connects it to the virtual network. This allows the host operating system to communicate with the virtual machines (VMs) in the network. Knowing this, I can then conclude that my Metasploitable IP is 192.168.135.155 (your maybe different).
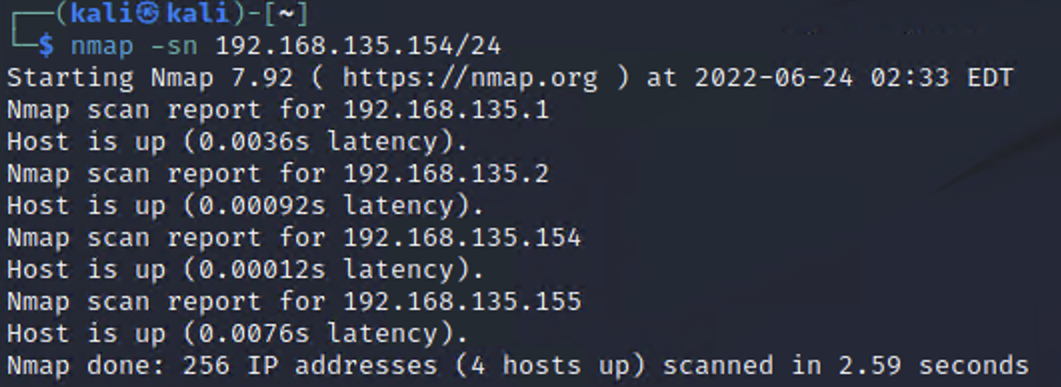
NMAP Host Discovery
skip this if your instructor already provided Windows 10)Our lab setup is now ready:
[Attacker Machine]
|
[Router/Firewall]
|
[Target Network]
[Metasploitable2 VM]
[Windows 10 VM]
[HawkEye VM]
[Exam VM]
[Project VM]
Linux Update vs. Upgrade The update command only updates the package list with the latest available versions, however, it does not install or upgrade the package. The upgrade command actually upgrades and installs the latest versions of packages that are already installed. Upgrade will take long and it's recommended you do it at the end of the lab activity