Samer Aoudi
Network Traffic Analysis

In this practical activity, you will use Wireshark to capture and analyze network traffic.

Why this activity? Analyzing network traffic is an essential skill for pentesting. During a pentest you will be looking for specific traffic that spreads out over a number of inbound and outbound packets. Using this skill, you can discover sensitive information and potential weaknesses in your target network; weaknesses which you may exploit later.

Prerequisite Knowledge: Basic networking; Kali Linux
Requirements: Completed Lab Environment Setup
Duration: 50min
Files: Wireshak.rar
Related Videos:
Networking Fundamentals for Security  Wireshark Demo
Wireshark Wireshark is a network protocol analyzer. It lets you see what's happening on your network at a microscopic level. For more information, visit Wireshark Website
Wireshark Interface
  • The menu is used to start actions.
  • The main toolbar provides quick access to frequently used items from the menu.
  • The filter toolbar allows users to set display filters to filter which packets are displayed.
  • The packet list pane displays a summary of each packet captured. By clicking on packets in this pane you control what is displayed in the other two panes.
  • The packet details pane displays the packet selected in the packet list pane in more detail.
  • The packet bytes pane displays the data from the packet selected in the packet list pane, and highlights the field selected in the packet details pane.
  • The packet diagram pane displays the packet selected in the packet list as a textbook-style diagram.
  • The statusbar shows some detailed information about the current program state and the captured data.
Wireshark UI

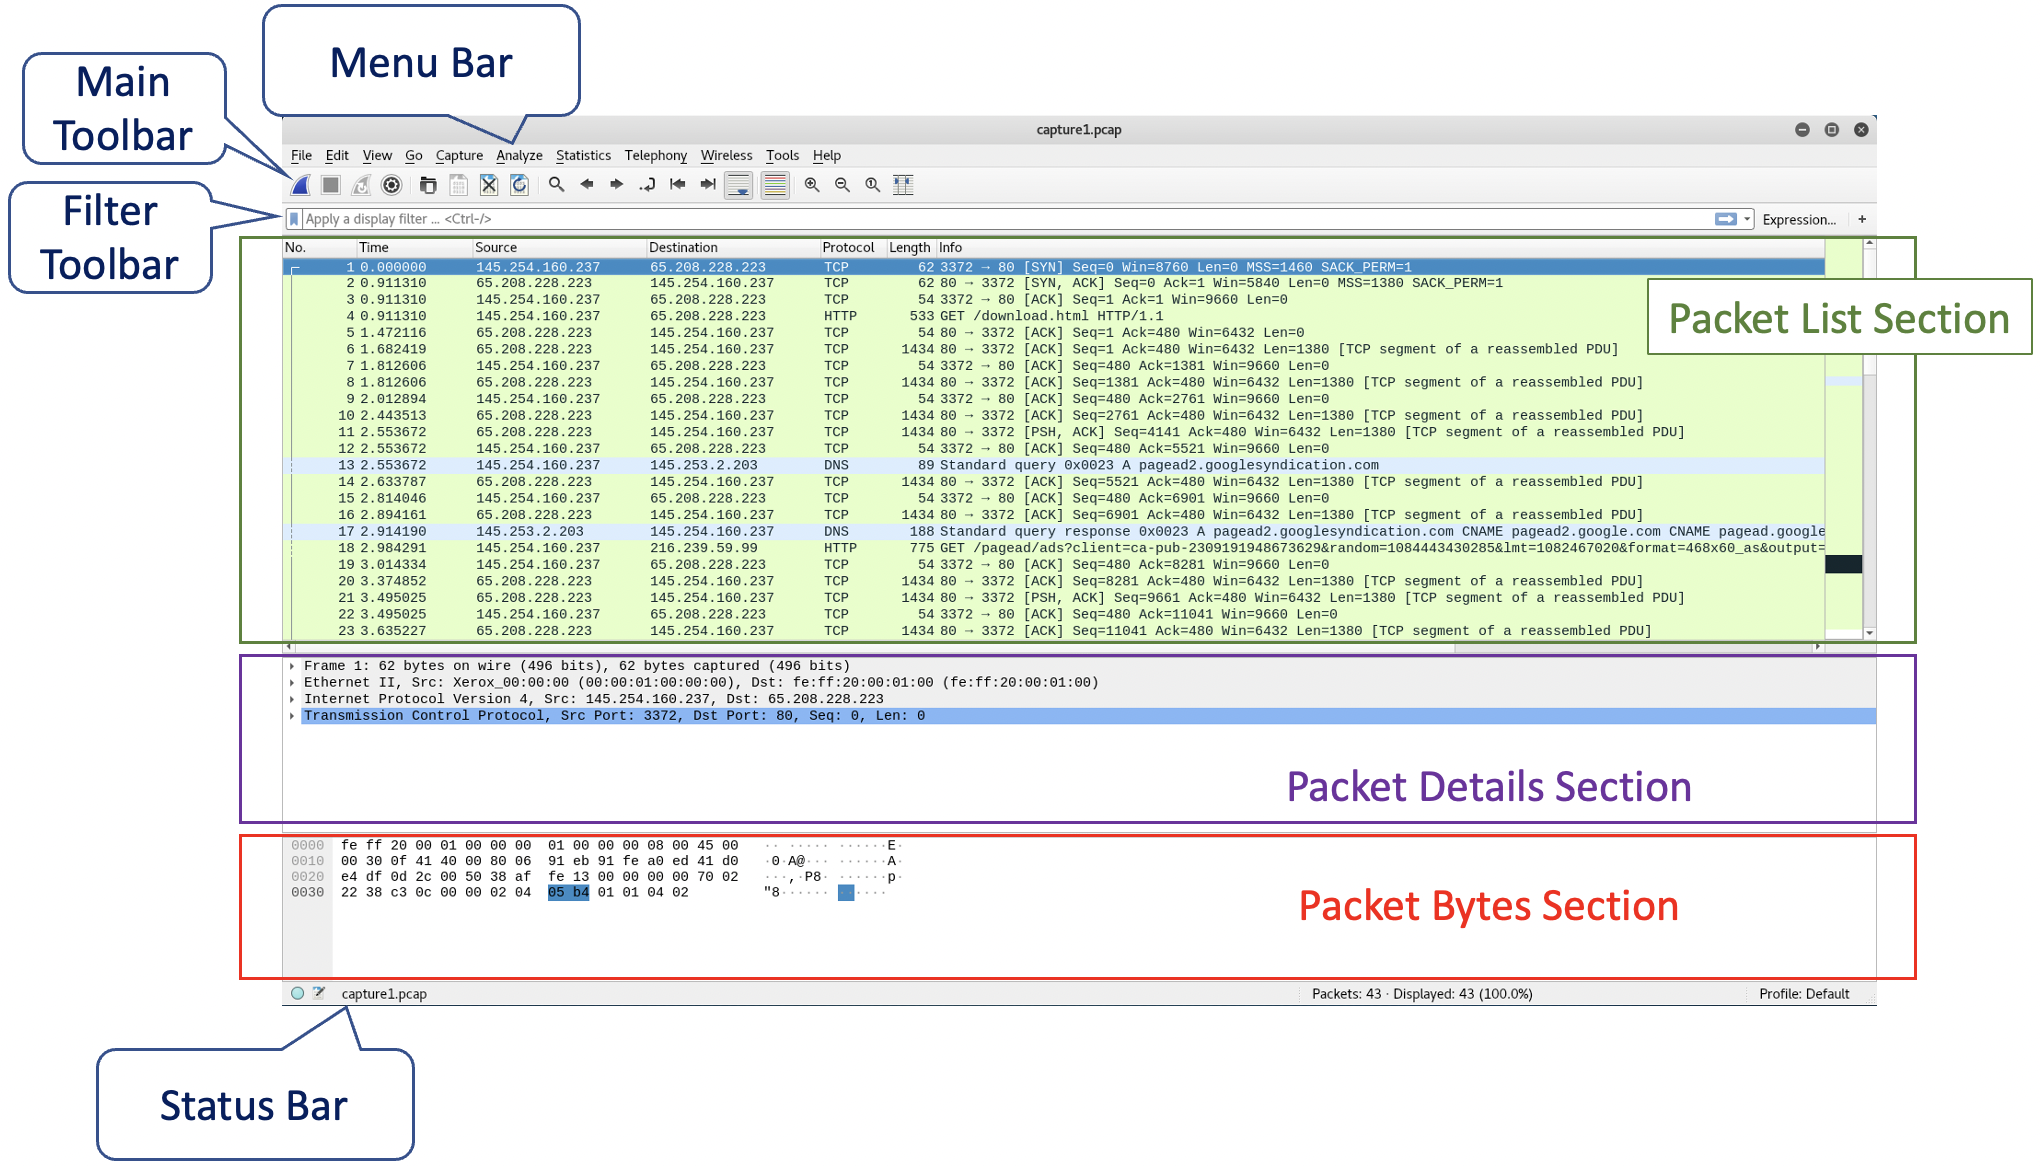
In this activity, you will capture network traffic using Wireshark.

Expert Mode
  1. Power on Kali and the two target machines
  2. Run Wireshark on Kali and start packet capture on eth0
  3. Ping your targets
  4. Ping any website
  5. Stop capturing packets and observe the traffic
  6. Edit the Wireshark interface to show the packet diagram pane instead of the packet details pane
Regular Mode
Task in details »
  1. Power on Kali, Metasploitable 2, and Windows 10
  2. Perform a host discover scan using nmap nmap -sn <Your Network IP>
  3. Write down the IP addresses of your targets
  4. In Kali, click the Applications icon in the top left corner, and type Wireshark
  5. Select Wireshark to launch the application, and notice the highlighted interface eth0
  6. The figure above provides useful information about the Wireshark user interface. Take a moment to locate the different sections.
  7. Click the fin icon in the main toolbar to start capturing packets on eth0
  8. While Wireshark packet capture is on, open a new terminal window
  9. Ping Windows 10 ping <Windows IP>
  10. Ping Metasploitable 2
  11. Ping any website (e.g., ping google.com)
  12. Go back to Wireshark and stop the packet capture (using the red square/stop icon)
  13. Observe the captured traffic. You should be able to locate the following information within each packet: source and destination IP; protocol; source and destination MAC addresses; and a lot of additional information
  14. Don't worry if you cannot locate certain information. Details will follow in the next task
  15. Click the File menu and select Save As
  16. Select the Desktop folder and nae the file My-First-Capture
  17. Note down the file type (i.e., extension)
  18. To show the packet diagram pane instead of the packet details pane, go to Edit → Preferences → Appearance → Layout
  19. In Pane 3, select the Packet Diagram radio button and click OK
  20. Once the pane is changed, hover your mouse over the different sections in the new pane

In this activity, you will analyze network traffic.

Expert Mode
  1. Download and extract Wireshak.rar in your Kali's Desktop folder
  2. Open the exracted capture file in Wireshark
  3. There is a login attempt to a Telnet service. Find the attempted password
  4. In the Questions section below, answer all questions relating to this capture file
Regular Mode
Task in details »
  1. In Kali, download the Wireshak.rar file and extract its contents
  2. Double-click the extracted .pcapng file to open it in Wireshark
  3. How many packets in total are in this capture file? To answer this, see the value in the status bar (Packets: ???)
  4. How many DNS packets are in this capture file? To answer this, you must first filter. In the filter toolbar, type dns and hit enter. See the value in the status bar (Displayed: ???)
  5. How many ICMP packets are in this capture file? To answer this, you must first filter. In the filter toolbar, type icmp and hit enter. See the value in the status bar (Displayed: ???)
  6. How many ARP packets are in this capture file? To answer this, you must first filter. In the filter toolbar, type arp and hit enter. See the value in the status bar (Displayed: ???)
  7. How many HTTP packets are in this capture file? To answer this, you must first filter. In the filter toolbar, type http and hit enter. See the value in the status bar (Displayed: ???)
  8. How many ICMP Echo Request packets are in this capture file? To answer this, you must first filter. In the filter toolbar, type icmp.type==8 and hit enter. See the value in the status bar (Displayed: ???)
  9. How many ICMP Echo Response packets are in this capture file? To answer this, you must first filter. In the filter toolbar, type icmp.type==0 and hit enter. See the value in the status bar (Displayed: ???)
  10. How many packets with SYN flag on, are in this capture file? To answer this, you must first filter. In the filter toolbar, type tcp.flags.syn==1 and hit enter. See the value in the status bar (Displayed: ???)
  11. How many packets with SYN flag on, are in this capture file? To answer this, you must first filter. In the filter toolbar, type ip.dst==192.168.182.129 and hit enter. See the value in the status bar (Displayed: ???)
  12. How many packets with SYN flag on, are in this capture file? To answer this, you must first filter. In the filter toolbar, type ip.addr==192.168.182.129 and hit enter. See the value in the status bar (Displayed: ???)
  13. Clear current filter and apply this one telnet
  14. Right-click any TELNET packet in the packet list pane, and select Follow→TCP Stream
  15. Note down the attempted login password
  16. Clear all filters and keep the file open
  17. Go to the Questions section and answer all questions
Name
Red fields are required.
2
3
4
View menu
Edit menu
Pane menu
Count them
From the details pane
From the status bar
Using filters
By sorting
By changing the view
Provide the following data for Packet #23
Provide the following data for Packet #1394

               
© Samer Aoudi 2005-2024